Version control is a very important concept. No matter where you are coming from as a programmer, it is critical that you understand the concepts behind version control. What is version control you may ask? Well I’m glad you asked. Here I will cover some of the basics behind version control, specifically around Git, and some of the basic commands that you will need to know in order to get started.
What is Version Control?
To start with, what is version control? Well, simply put it is how we track what changes have happened in a project, when they happened, and who is responsible for them. Git provides an excellent way of keeping track of this kind of information. First off, it is important to know that git lives primarily in your terminal. There are a number of different graphic user interfaces that can provide similar information, in it’s native form, git operates in the command line. Most systems come with git already installed, but if you want to check just type git into your terminal and hit enter. You should get a list of commands that can be used with git. If not, you will need to install it. For more information on how to install git check out this getting started guide provided by https://git-scm.com/.
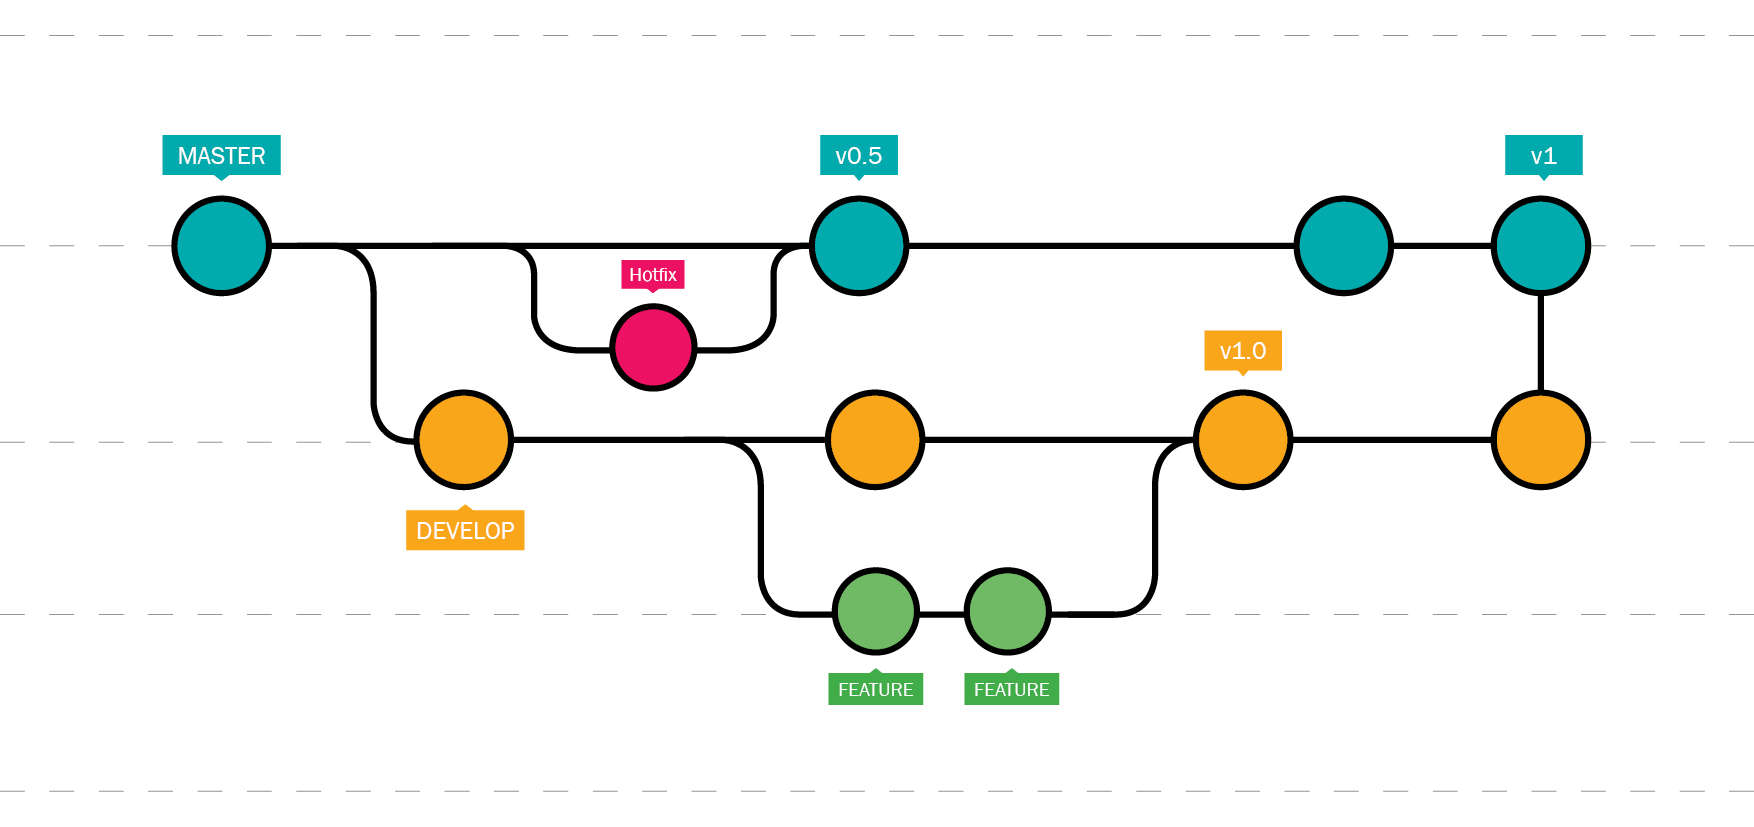
An easy way to think about version control is that it is like making a copy of your code that is separate from the original. You can then modify this copy without impacting your primary code base. Once you have reviewed and tested your copy to make sure that it works and is doing what you want it to do, you can merge it into your original (often referred to as master or main). In this way you are able to make changes and adjustments without having to worry about breaking the code you have that already works. Above you can see an example of how this kind of “branching” works. For more details about how this works, check out the git website. All of the information that I have compiled here comes directly from their outstanding documentation.
Now that we have covered what version control is, we need to think about what version control can do for me? Well, there are all the benefits that come with being able to track your changes, but there is also the benefit of backups. Git is the perfect tool for keeping backups of your code through tracking of these small changes, or commits, that you make while you are updating your code. Each of these commits can be applied to your local repository as well as a remote repository. This remote repository can act as your backup in case something happens to your computer, but it can also provide a remote location for other developers to share your code. This is how open source projects store their code so contributors can access it when they want to help with the project. There are a number of different remote locations that you can use to store backups of your code including GitHub, bitbucket, and gitlab. Personally I use GitHub, so I will focus on that here.
Configuring Git
So lets say that you have just sat down to start your first project, what do you do first? The first really important thing to do is to make sure your git environment is properly set up. This means configuring your basic user information so that you can sign your commits when you create them. These are all handled through the git config command. The first one is git config --global user.name "Your Name". In this command you are telling git to add to the global configuration file the user name that you specify in quotation marks, just don’t forget to change that to your actual name. The next command is git config --global user.email yourname@example.com. This command works the same way as the first except you are entering your email address instead of your name. The next command git config --global init.defaultBranch main, is used to change the name of your default branch from master to main. This is good to do if you are using GitHub because they have the default branch configured to be main also, so this will help to prevent confusion. The last command is optional, but really helps to make things a little more readable. git config --global color.ui auto will provide colorized output which is a nice way of being able to tell things like what files have already been added to tracking and which ones have not, but we will get into that more later. Once you have completed these configuration steps you can verify that you set it up correctly by running the command git config --get user.name to find out what user name has been saved. You can replace user.name with a different parameter if you want to check those instead.
Workflow with Branches
Before we move onto more detailed commands, lets look at the best ways to use git to manage your project. Like we mentioned earlier, git does a great job keeping track of what changes have been made and who made them. This works perfectly if you are working alone, but what if you are working with a team. The best choice in that case is to use branches. You can think of a branch as your own personal copy of the entire code base. Anything you do on that branch will not impact the main project. For this reason, when you start to work on new feature or bug, you should start by making a new branch. When you are done working on your changes, you create a pull request, or PR. This is where you request to merge the changes from your branch onto the main branch. This also gives other people a chance to review your code changes before they get merged onto the main branch. This is a great time for code reviews, where people can look over what you did and test out the changes. They can also make recommendations or ask questions. It’s just a good time for a general discussion about what you did. Now, lets get into how some of these functions are performed.
Starting From the Terminal
Now that configuration is out of the way, the next step is to decide where we would like to initiate the project, on GitHub or on your computer. Well, that is a matter of preference. Both will overlap after the initial steps, so you can pick whichever method you would like without having to worry. Here I like to start with the terminal on my own computer. First I navigate to the file that my project is in and run the command git init. This tells git to start tracking the changes made to files. When you want to save your changes, you make a commit. In order for you to make a commit, you first have to select the files that you would like to save. To do this you use the command git add file where file would actually be the name of the file you are tracking. This will only work for files that have been changed since the last time a commit was done. Once that is done you can make your commit by running the command git commit -m "first commit". The -m modifier means that you are going to add a message in this same line. Here the message we are adding is first commit. Every commit should have a message that helps you to remember what you changed. This comes in handy later if you need to undo some changes. If you don’t add a commit message in line you will be brought to a VI editor to add a message after the command runs, but that is another lesson. If you haven’t changed the name of your base branch to main and you plan to use GitHub, you will need to run the command git branch -M main. This tells git to change the name of your current branch, which at this point should be your default branch master, to main. The -M stands for move, which basically is like renaming the branch. By making it a capitol letter you are forcing the command, which can also be done by adding the flag -f.
So now we have a project started, configured, and we have our first commit. Now we need to save it to GitHub so other people can participate and so we don’t loose our work. You will need to log into GitHub and set up a new repo. GitHub has great documentation on how to do this, so just refer to their documentation for the most up to date info. Once you have your repo set up, it will give you a location that you can use to store your code. From your home computer terminal you can then run the command git remote add origin location where location is the name that GitHub gave you. This will establish this GitHub location as the place to store information from now on. Once that is done you can send your code to GitHub with the command git push -u origin main.
Starting from GitHub
If you don’t want to start your repo from your local terminal, you can instead start it from GitHub. In this case I would generally recommend adding a read-me when start your repo so you have something that you can pull down during the next step. Once you have your repo set up, or once you have found a project that you would like to work on locally, you can pull that onto your computer using the command git clone location where location is the location you are trying to pull from on GitHub. The entire repo will be downloaded to the file location that you are at in the terminal that you run the command.
What’s Next
There is quite a bit more to learn when it comes to git. As I’m writing this I realize that the topic requires another blog post to be sure. In the mean time don’t forget to checkout https://git-scm.com/ which is the source of all information git. They also have a free book that you can download that has all kinds of detailed information and commands to help you with your version control needs.
Thank you for stopping by and reading. If you have any questions or comments I would love to hear about it. Click the email button below and let me know what you think!